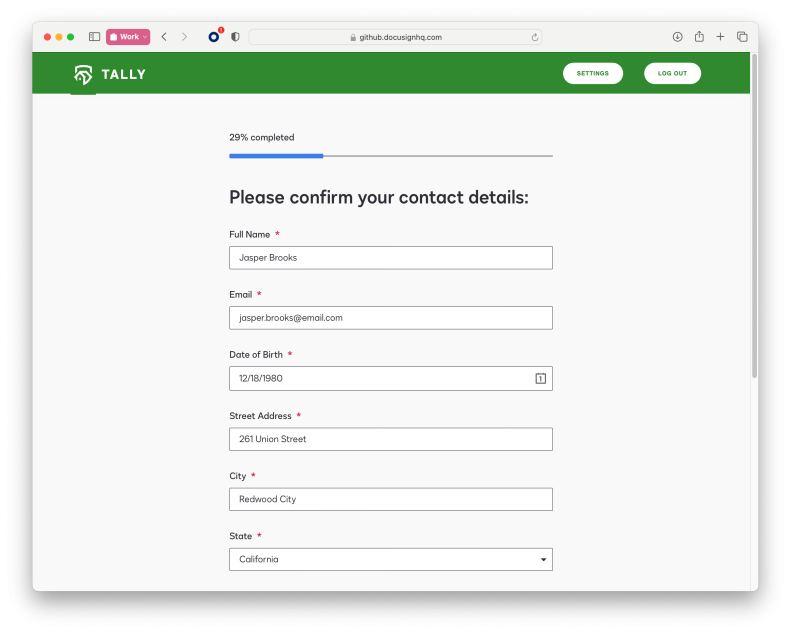
Introducing new Web Forms API and embedded forms functionality
Docusign Web Forms streamline data collection by providing an interactive and seamless form-filling experience for your signers. With Web Forms, you can speed up form completion and more easily unlock the data within your agreements.
Today, we are introducing a new Web Forms API for developers, enabling you to manage web form configurations and instances in your Docusign account. In addition, we are introducing enhancements to Docusign JS, a JavaScript client library that you can use to seamlessly embed a web form instance in your website.
With the Web Forms API and Docusign JS library, you can:
- Ensure that web form instances are secure and unique to an individual user
- Embed web form instances in an authenticated web application
- Prefill form fields with customer information from a system of record
- Monitor the status of web form instances and corresponding envelopes generated after form submission
- Retrieve user-submitted form data for export to external systems

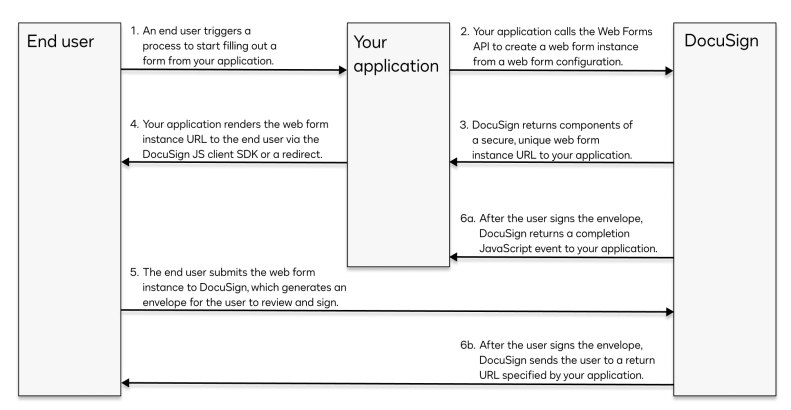
A typical implementation will look something like this:

Using the Web Forms API to create web form instances
To get started, make sure that you have created and activated a web form configuration in your account. When a user triggers a process to start filling out a web form on your website, your application should make a POST request to Instances:createInstance, using your account_id and form_id as path parameters and passing additional values in the request body.
Below is a sample Instances:createInstance request body that includes a formValues object for prefilling form data:
{

  "clientUserId": "1234-xxxx-xxxx-efda",

  "formValues": {

      "name": "Sally Signer",

      "email": "sally.signer@email.com",

      "salary": 121800.55,

      "birth_date": "1980-12-18",

      "marital_status": "single",

      "education": "advanced",

      "alerts": ["Funds_withdrawn","Account_info_changed"]

    },

  "expirationOffset": 720,

  "returnUrl": "https://developers.docusign.com"

}
Notes:
clientUserIdis the only required property and can be set to any string (up to 100 characters) to identify the user filling out the web form.- Fields specified in
formValuesare referenced by their API reference name (also called componentNames in the API). - Date values must always be provided in YYYY-MM-DD format.
- Number values must be provided with no quotes and no thousand separators and must use a period for a decimal point, if needed.
- Dropdowns, radio groups, and checkbox groups must reference valid API values; for checkbox groups, you can provide an array of multiple values.
expirationOffsetis provided in hours; the web form instance can no longer be submitted after it expires.- If you plan to redirect to a web form instance URL (rather than use the Docusign JS library),
returnUrlenables you to specify a confirmation page for the user after they finish signing.
Instances:createInstance returns a formUrl and instanceToken that can be used to construct a web form instance URL in the following format:
https://[formUrl]#instanceToken=[instanceToken]
For example:
https://demo.services.docusign.net/webforms-ux/v1.0/forms/333fdc52xxxxxxxxxxxx24c6cc03#instanceToken=U2FsdGVkxxxxxxxxxxxxqgmZHxw=
Note that the instanceToken expires within 5 minutes. An error is displayed if your application tries to load a web form instance URL that includes an expired instance token. However, your application can obtain a new instanceToken by calling Instances:refreshToken, allowing your users to return to the same instance across multiple sessions.
Rendering web form instances
Your application can redirect to the web form instance URL, as constructed above, or use Docusign JS to embed the instance in your website. Docusign JS libraries are available here:
- Developer environment: https://js-d.docusign.com/bundle.js
- Production: https://js.docusign.com/bundle.js
Some of the benefits of Docusign JS include:
- A unified experience for users that makes the web form instance appear as if it's hosted on your website
- A focused view display of the envelope that Docusign generates after a user submits a web form instance. Focused view eliminates some of the Docusign signing UI components, further contributing to a seamless user experience.
- Display customization options
- Form and envelope events that your application can use to trigger actions
You’ll find a sample implementation using Docusign JS in our Create and embed a web form instance guide.
Start using the new Web Forms API and updated Docusign JS library on all developer accounts today!
