Beyond eSignature for Salesforce: Smart Send
When integrating Docusign eSignature into your Salesforce organization, there’s a lot you can do with our Docusign managed packages, from building custom lightning buttons out of the box (OOTB) to developing with Apex Toolkit.
In this three-part blog post, I will be sharing some tips and tricks on how I used these packages to solve some interesting use cases:
- Smart Send (OOTB): Selects Docusign envelope templates based on object fields
- Clever Send (Apex Toolkit): Adds dynamic supplementary documents and access codes to Docusign envelopes based on certain conditional logic
- Smooth Flow (OOTB): Updates the Salesforce Chatter feed with custom updates
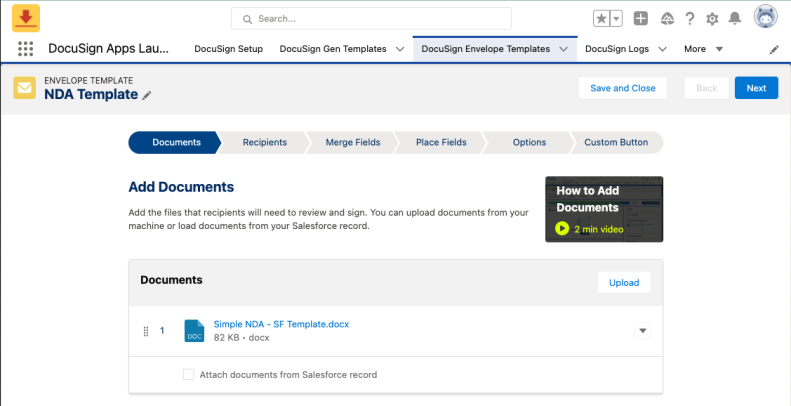
Out of the box, Docusign’s eSignature for Salesforce managed package has a clicks-not-code configuration setup. This means that even non-technical users can set up custom buttons easily. By following a step-by-step wizard, users can easily create and add custom buttons to any object to send out Docusign envelopes. eSignature for Salesforce can quickly help users integrate Docusign and SalesForce together, allowing users to work off a centralized SalesForce platform, sending out Docusign envelopes, collecting information from recipients, getting documents signed, tracking these envelopes, and eventually merging information and storing completed documents back onto SalesForce.
Why Smart Send?
Customers love how simple it is to integrate Docusign eSignature with Salesforce! However, customers often have many different use cases, which means multiple prebuilt envelope template configurations (and buttons) are required for different documents, workflows, and settings. Having multiple buttons on an object’s page clutters the layout and creates a lot of confusion for users. “Smart Send” is a useful approach to (1) minimize the number of buttons on an object layout and (2) ensure the correct envelope template gets selected, which helps to reduce clutter and human error. Smart Send is controlled via an object field that automatically selects the configured envelope template.
Example


In the example above, as opposed to having two buttons (New Business and Existing Business buttons), I have replaced it with one button (Smart Send).
Smart Send selects respective Docusign envelope templates based on the Type field selection. In the video above, you saw how when different Type selections were made, different envelope templates (Existing Business, New Business) were used. Each of these templates contained different documents.
Another common Smart Send use case was to select envelope templates automatically based on country or region: for example, when the Country field is “Australia”, initiate the Australia template for sending, and when the Country field is “Singapore”, initiate the Singapore template for sending.
The setup
Step 1: Create envelope templates
Create the envelope templates as you would usually do it:

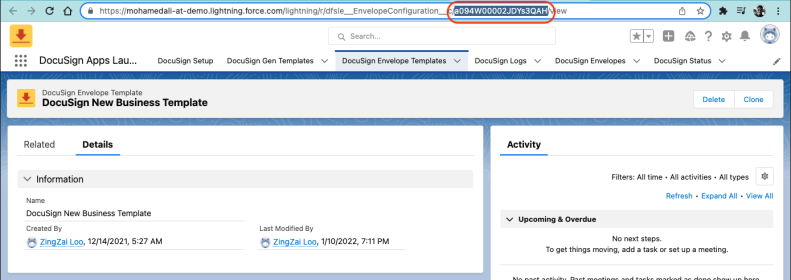
Copy the two templates’ 18-character alphanumeric SalesForce object IDs. SalesForce object IDs can be found in the URL paths:
Step 2: Create custom fields
For picklist selection options (skip this if you already have setup a picklist field):
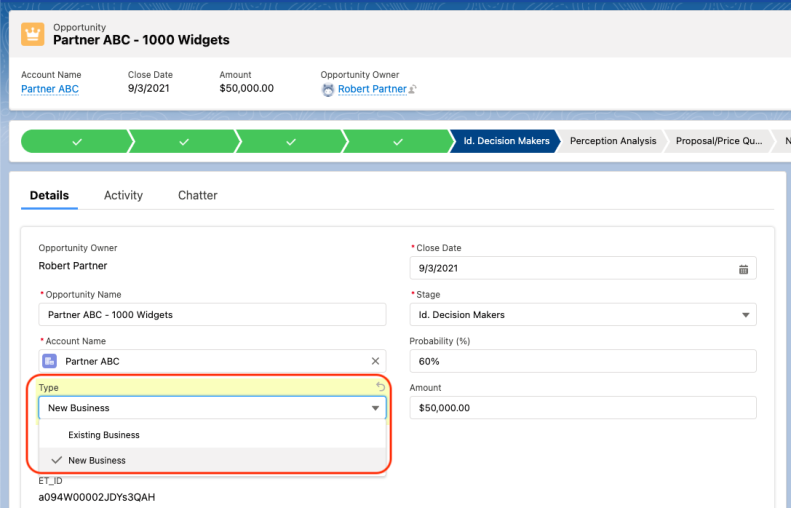
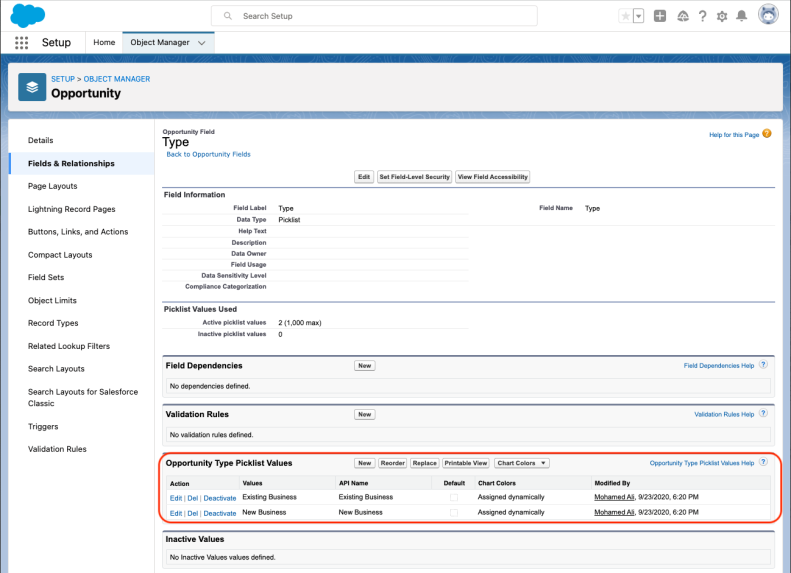
In the example above, a Type picklist field was created with two picklist values: “Existing Business” and “New Business”.
For connecting picklist selection options to envelope templates:
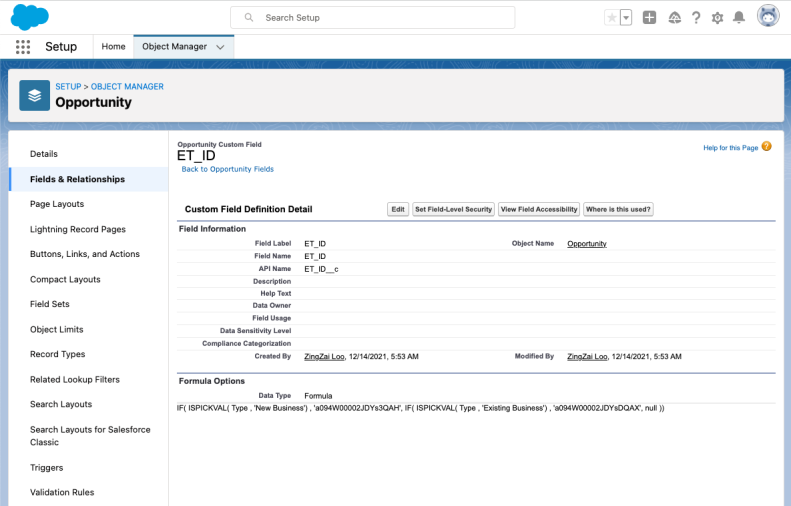
IF( ISPICKVAL( Type , 'New Business') , 'a094W00002JDYs3QAH', IF( ISPICKVAL( Type , 'Existing Business') , 'a094W00002JDYsDQAX', null ))
The custom formula field above is a Formula field that returns Text. It contains conditional statements that control and manipulate which envelope templates will be selected based on when a certain Type field is selected. Change values according to your requirement:
- Type: Replace Type with the Field Label of your custom fields in the picklist field.
- “New Business” / “Existing Business”: Replace selections with Picklist values found in the picklist field.
- “a094W00002JDYs3QAH” / “a094W00002JDYsDQAX”: Replace with SalesForce envelope template IDs found in Step 1.
You can nest additional conditional statements if you have more than two options in your picklist. I find picklists easy to use and configure, but you are not restricted to picklists fields.
Step 3: Create a custom button
Now, create a new button and call it whatever you want. This will be your Smart Send button:
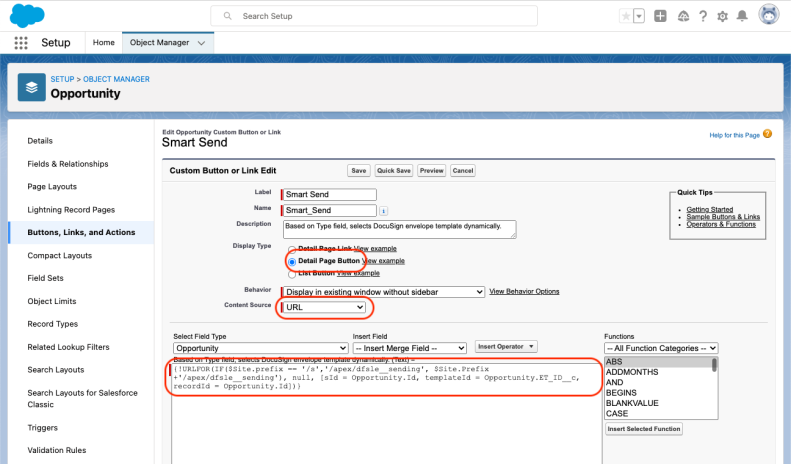
{!URLFOR(IF($Site.prefix == '/s','/apex/dfsle__sending', $Site.Prefix +'/apex/dfsle__sending'), null, [sId = Opportunity.Id, templateId = Opportunity.ET_ID__c, recordId = Opportunity.Id])}
The URLFOR function helps trigger the Docusign sending process. Change values according to your scenario:
- Opportunity: Replace “Opportunity” with the custom object that you are working on.
- ET_ID__c: Replace the field label with the API Name found in the custom field definition in Step 2.
Step 4: Add the custom button to your page layout
Finally, add the Smart Send button to the page:
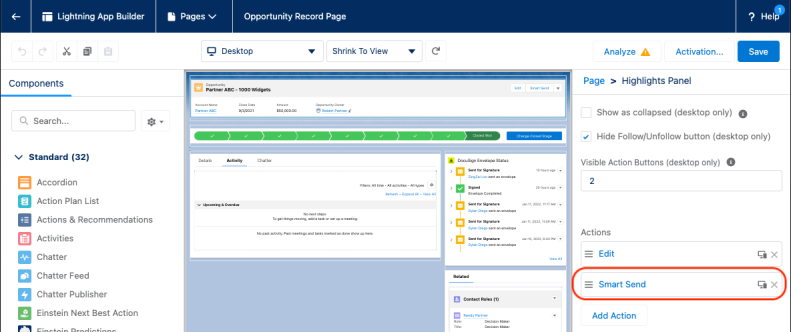
Edit the object page layout by selecting the gear icon and then Edit Page. Select the Highlights Panel, Add Action, and then add the Smart Send button.
It is done! The object page is much smarter than before. Visit your object page layout, add your custom button, and test it out!
Smart Gen (bonus section)

Besides eSignature, Docusign also has other products such as Docusign Gen which lets you effortlessly merge customer, product, and pricing data to generate agreements for eSignature without leaving the Salesforce user interface. The approach above also works for Docusign Gen. You can also set up a custom button that lets you generate a document dynamically based on an object field selection. A sample code block for the custom button as follows:
{!URLFOR(IF($Site.prefix == '/s','/apex/dfsle__gendocumentgenerator',
$Site.Prefix +'/apex/dfsle__gendocumentgenerator'), null,
[sId = Opportunity.Id, templateId = ''+Opportunity.GT_ID__c+'',
recordId = Opportunity.Id, title = 'Generate Sales Order'])}
Conclusion
Docusign’s eSignature for Salesforce gives businesses the ability to send, sign, track, and save agreements in Salesforce. This helps businesses accelerate business cycles significantly.
In situations where you want to reduce UI clutter and human error, Smart Send is a creative approach to create an overall better user experience for sending out Docusign envelopes from Salesforce.
